
To write a blog post, know exactly who you’re writing for, pick a topic they’re actually searching for, and write a specific headline that promises clear value. Structure the post with headings and short paragraphs, draft freely and edit later, optimize it for search, proofread, then publish and promote it.
Whether you want to promote a brand or share your ideas, blogging can be a great way to achieve it. Top sites can attract thousands of visitors every month and generate an impressive amount of revenue.
Of course, these heights can feel pretty distant when you’re starting out. To make the climb, you will need to pick up a range of skills. The first milestone is learning how to craft great content.
So, what’s the secret to writing a blog post that people actually want to read?
In this guide, we’ll show you how to write a blog post in 10 steps, from audience research and headlines through to search optimization, publishing, and promotion. (Haven’t launched your site yet? Our guide on how to start a blog covers the setup.)
How to write a great blog post
Here’s the writing process, step by step.
First, pick your niche
Before any individual post, decide what your blog is actually about. A clear niche makes every step that follows easier: you know who you’re writing for, what they search for, and which sites you’re up against. Three quick tests help here:
- The passion test: Could you write 50 posts on this topic without dreading it? If not, keep looking.
- The competition test: Other blogs in your space are a good sign, not a deal-breaker. Look for evidence that people spend time or money on the topic: active blogs, a busy subreddit or forum, books and courses for sale. If nobody is serving the audience, question whether it exists.
- The narrowing test: Broad topics (“fitness”) are brutally hard to win. A specific angle (“strength training for new parents”) gives you a realistic shot at ranking and a clearer voice.
With a niche settled, you’re ready for the per-post process:
1. Understand your audience
Before you begin the writing process, it’s essential to think about your readers.
Who is likely to read this post, and what will they gain from doing so?
The answers to these questions can help you decide what blog content to include in your post. For example, an expert web designer probably doesn’t need an explanation of every technical term. However, readers who are new to the topic might need more information.
Equally, audience research can shape your writing style. If your post is primarily aimed at college kids, an informal approach will likely do well. In contrast, middle-aged mortgage brokers may appreciate a more professional tone.
How do you figure out who is likely to read your posts and what interests them? It’s a mix of the following factors:
- Topic: Who will likely be interested in the subject you are writing about? This may require a little guesswork.
- Analytics: If you already have visitors to your website, you can check your analytics data to see what kind of people are dropping by.
- Competitor research: Search for posts on a similar topic. Then, take note of which sites come up and study the content in each post.
- Keyword research: Search for terms related to the topic of your blog post on Google and see what autocomplete suggestions come up. This can give you some insight into what kind of information people are looking for.
Pulling together all of this information should prepare you for the next step.
Keyword
Keywords are words or phrases that describe the content of a website or web page. They help search engines match these elements to relevant searches.
Read More2. Spend time on ideation
Once you know who you’re writing for, it’s worth spending some time on generating blog post ideas.
Keyword and competitor research is a key part of this process. Checking the autocomplete suggestions on Google can reveal exactly what people are looking for, while competitor research shows what is working for big sites in your niche.
Of course, you don’t have to stick with the tried and tested — coming up with a unique slant on a particular topic idea is a great way to stand out from the crowd.
Here are some techniques that can help with brainstorming blog topics:
- Make a note: Ideas can strike at any time, so make a note on your phone or keep a notebook to hand.
- Use mind mapping: For some people, using a mind map to explore and visualize the various parts of a topic really can help.
- Look at trending topics: Check Google Trends and social media hashtags to see what’s currently popular.
- Build a list of prompts: Many blog posts are based on well-established templates, like “how to” and lists. Collect a list of these prompts, and you will have an ideation shortcut.
Frequent bloggers tend to have a system for storing and organizing ideas. If you prefer digital note-taking, Notion is a great free tool that allows you to build an entire workflow.
3. Create a compelling blog post title
The most successful blog writers tend to spend a significant amount of time on creating a strong headline.
Why? Because titles really matter. If someone doesn’t find your headline interesting, they’re not going to read the post.
Of course, there is an art to crafting an appealing headline. Certain formats are more likely to succeed than others:
- Titles of 6–13 words attract the highest and most consistent traffic, according to OptinMonster’s blogging statistics roundup (updated December 2025).
- The more explicit a headline is about the reader takeaway, the more it resonates, per a 2013 Conductor survey published on Moz.
While it’s certainly worth keeping these facts in mind, there is more to writing a good headline than hitting the right word count. Here are some general guidelines to follow:
- Focus on value: In most cases, people will click on your post because they’re looking for information or insight. Be sure to highlight the importance within your title.
- Play on emotions: Headlines that evoke curiosity or controversy tend to attract more interest. (Just be careful to avoid clickbait because this can backfire.)
- Use numbers: Numbers are powerful in headlines. Whether it’s tips, steps (like this post), or secrets, people are attracted by the depth of information you’re promising.
- Consider SEO: Include terms in your headline that your target audience is likely to be searching for.
One more pro tip: Write loads of headlines for each post. Some people say 20, others say 100, but specifics don’t matter. What counts is exploring all possible avenues for your title and finding the gem in the rough.
4. Structure your post
If your headline is good enough, people will visit your blog post. The next challenge is to keep them engaged.
Obviously, the quality of your writing makes a difference here. So does the content of your post. But it’s also worth paying attention to the structure of your article.
Even if you’re the most gifted author on Earth, most people are unlikely to wade through a wall of text. So, it’s important to break up the word soup with plenty of content croutons.
Take this post as an example. So far, we have used:
- Headings
- Subheadings
- Bullet points
- Graphics
- Embedded content
Embed
Embed means to insert external content directly into a web page rather than linking to it. Embedding enables visitors to view the content without leaving the website.
Read MoreEach of these features provides a little light relief from full-on reading. Headings provide signposts, and they can guide the reader to sections that most interest them.
Graphics help to provide extra information in visual form, and bullet points are much easier to digest than long sentences.
Some other elements you can use to break up your post include:
- Videos
- Code snippets
- Blockquotes
- Embedded social media posts
- Infographics
Between these inserts, you can improve the readability of your post by breaking the text into small paragraphs. When paragraphs are longer than four or five sentences, it becomes harder to pick the right line, and the reader’s attention tends to wander.
5. Make it engaging
The best way to keep readers hooked is by writing something truly captivating.
Most blog posts, particularly in content marketing, are information-based, and that’s fine since most people who find your blog are probably looking for answers rather than opinions.
That said, good writing skills are incredibly valuable. Storytelling is a powerful tool for delivering knowledge. Every non-fiction bestseller is filled with case studies, personal anecdotes, and hypothetical situations.
To sprinkle some of this magic into your own blog posts, try these techniques:
- Use descriptive language: Remember when we talked about “word soup” and “content croutons” earlier? This kind of descriptive language can add color to any topic.
- Think about pacing: Short sentences grab the attention. You can then follow up with a longer sentence that provides extra detail and draws in the reader. (See what we did there?)
- Show, don’t tell: People tend to remember real-world examples and anecdotes much better than dry facts.
- Conflict and resolution: Every good story needs a hero who fights and eventually overcomes a villain/problem. You can use this writing device to spice up any type of blog.
- Beyond text: Remember, you can use images and videos to bring your stories to life. For instance, you could use a photo of a brand that you’re mentioning in a case study.
Along with storytelling, there are certain elements that you will find in most good blog posts. They include:
- A strong intro that provides a preview of the post and makes the reader want to stick around
- A section that sets up the topic
- Short summaries of each major section
- A conclusion that brings together everything that was mentioned in the post
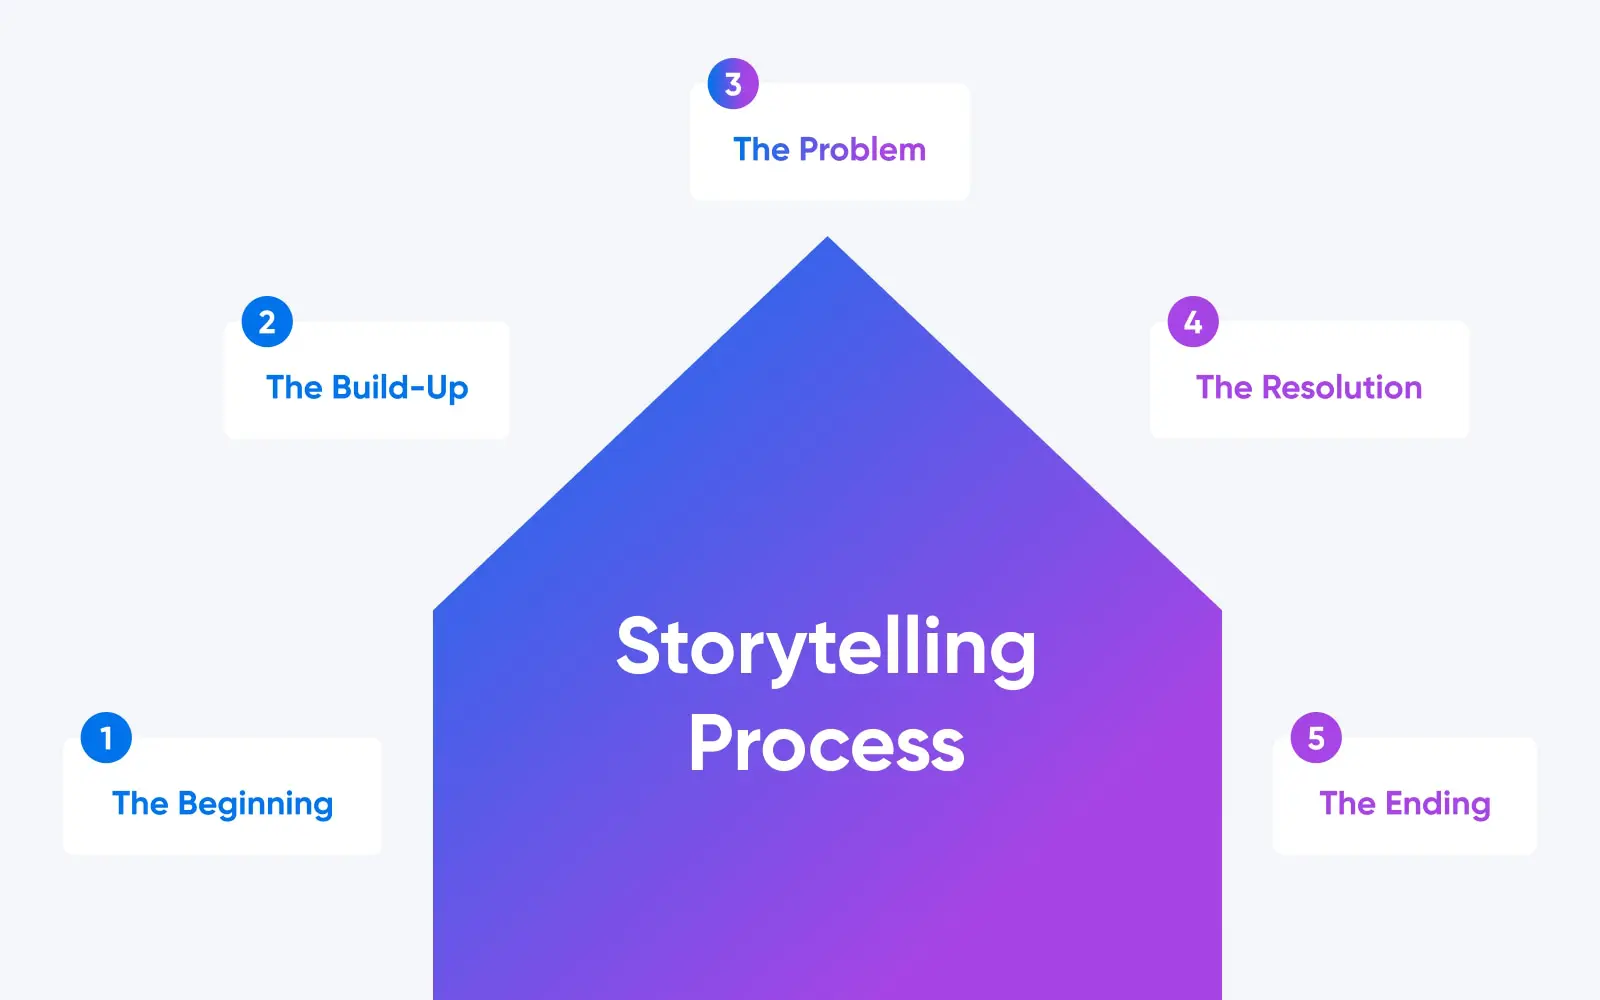
There’s a lot to take in here. But then, writing blog posts is a skill that takes some time to master. Remember that the principles above are just guidance; the best way to improve your skills is by writing.
The learning process starts with writing your first blog post.
6. Write first, edit later
Many new bloggers make the mistake of trying to create the perfect first draft. Even for experienced professionals, this is almost impossible.
What’s more, editing as you go is likely to slow you down and disrupt your train of thought. You can easily find yourself stuck with writer’s block as a result.
Instead, try just writing.
You can plan out the structure of your post in advance if you want. In fact, that is often a good idea. But when you start writing, let your ideas flow.
Once you complete your draft, you can go back and tweak anything that needs improvement. The backspace button is your friend; if a sentence doesn’t really add anything to your piece of content, delete it.
A quick word on AI writing tools
AI assistants are now a normal part of many bloggers’ workflows. In Semrush’s content marketing statistics report (April 2024), 58% of businesses said they use AI to research content and topic ideas, and 39% of marketers said they use it to create content outlines.
Used well, AI is a brainstorming partner: it can generate topic angles, headline variants, and rough outlines in seconds. Used lazily, it produces generic prose with no first-hand experience behind it, and it will happily invent facts and sources.
So set some ground rules. Treat AI output as raw material instead of a finished post. Rewrite it in your own voice, fact-check every claim and statistic against a primary source, and add the examples and details only you can supply. That last part is what makes a post worth reading — and worth citing.
7. Maintain consistency
Another feature of high-quality content is consistency.
Starting out with a jokey tone before switching to pure professionalism is likely to confuse readers and convey mixed messages. Shifting your headlines from title case to sentence case halfway through an article will make readers look twice. Using a variety of colors to highlight sections of text will cause equal confusion.

Maintaining consistency throughout your post will ensure your readers don’t encounter these distractions.
The same applies between different posts — to a certain extent. Picking and sticking with a particular style across all your content is a great way to establish a brand for your business, or a signature style on personal blogs.
8. Optimize your content for search
Remember when you were doing research on topic ideas? During that process, we talked about discovering what people are searching for.
Those searches are important, because they could lead people to your blog post.
To make this happen, you need to embrace search engine optimization, or SEO. This is where you try to convince Google and other search engines that your blog post is the most relevant resource on a particular topic.
SEO
Search Engine Optimization (SEO) is the practice of improving a site’s ranking in search results. Search results are aggregated based on a number of factors, including a site’s relevance and quality. Optimizing your site for these factors can help boost your rankings.
Read MoreOn-page SEO is a deep subject area. Some people make careers out of improving search rankings.
However, there are some basic techniques that anyone can use to push new blog posts up the search engine results:
- Go in-depth: Search engines love content that goes deep and answers all the questions that users might have. Depth doesn’t mean padding: the average reader spends just 52 seconds on a post, per OptinMonster’s blogging statistics (updated December 2025), so cover the follow-up questions a searcher will ask next instead of stretching the word count. And since only 14% of bloggers regularly write 2,000+ words, genuinely thorough posts face thinner competition than you’d expect.
- Use plenty of keywords: Including plenty of keywords that relate to relevant search terms will signal to search engines that your content is worth promoting. Plugins like Yoast SEO can help you here.
- Fill out your meta tags: Meta tags hold key information about online content, and they are used by search engines. By including keywords in your meta title and meta description, you can prove that your content is very relevant to specific search terms.
- Add alt text: Accessibility is valued highly by search engines nowadays. Filling in the alt text field for your images is a great way to improve your ranking and make your site easier to navigate for people with a sight impairment.
If you want to learn more about search engine optimization, check out our in-depth guides on the subject:
- How to Improve SEO Rankings
- On-Page vs. Off-Page SEO: Complete Guide & Essential Tips
- Beginner’s Guide to Schema and How It Can Help Improve Your SEO
- 25+ Best Free and Paid SEO Tools Around (Bookmark These!)
9. Check and cite your sources
Stats and quotes are key ingredients of a perfect blog post. They add credibility to your writing and help to inform readers.
However, it’s worth being careful when including the work of other people in your content.
Plagiarism is not a good look, and it can ruin your SEO. Misquoting someone won’t make you popular, and including incorrect statistics will undermine your credibility.
To avoid these potential pitfalls, make sure to:
- Cite your sources: Link to the source you are quoting from, or use traditional academic citation.
- Find the original source: There are many made-up quotes and statistics online, so make sure to track down the origin of any quote or fact.
- Check for plagiarism: If you are using reference materials while writing your post, use a tool like Copyscape to check for plagiarism. It’s easy to copy by accident.
Be selective about the sources you use, as well. For instance, a site like Wikipedia that can be edited by anyone is not a good source. Instead, try to use sources with some authority on the topic you’re writing about.
10. Always proofread
You might think that making a few spelling mistakes or grammatical errors wouldn’t matter too much in a blog post. You would be incorrect.
People want to learn from credible sources. If your content has typos all over the place, your writing will come across as unprofessional — even if it contains incredible knowledge.
For this reason, proofreading should be an essential final step in your writing process.
Self-editing is quite difficult, because the mind easily skims over mistakes it has just made. So, it’s a good idea to do your final proofread at least one day after you write the draft.
To make the process a little easier, you can use a browser plugin like Grammarly.
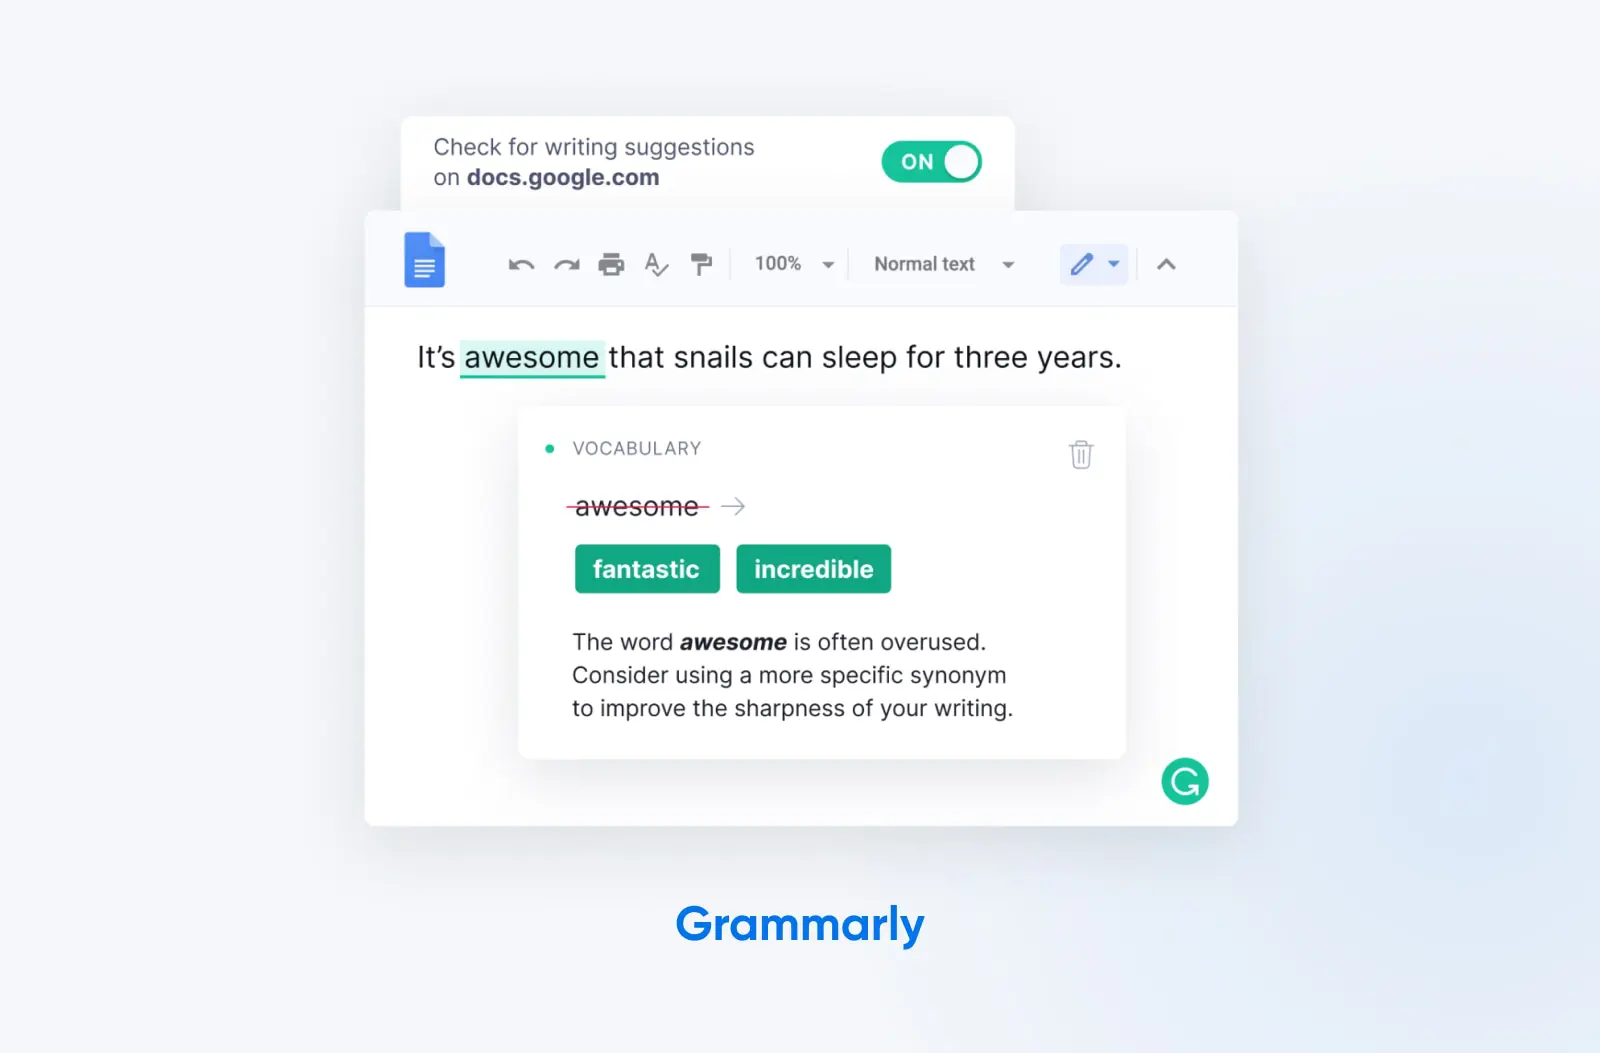
These tools can highlight potential errors, and also provide suggestions on how to improve your writing. Alternatively, you can write your post in Google Docs or Word, and use the built-in spell checking features.
Bonus: Add a call-to-action (CTA)
If you’re blogging to make money, promote a product, or champion a cause, consider adding a CTA (call-to-action) to your blog posts.
As the name implies, a CTA asks the reader to take some additional action. This could be buying a product, signing up for an email newsletter, or making a donation for a charitable cause. You could even ask readers to share your article on social media if they found it interesting.
In the context of a blog post, CTAs normally take the form of a text link or another clickable element, like a button.
If you want to make your CTAs effective, here are some key points to remember:
- Be clear and specific: A good CTA should make your request really obvious. Tell readers exactly where to click, which form to fill out, and so on. Don’t leave them guessing.
- Use action-centered language: Using terms like “Download now,” “Sign up today,” and “Get started” is more likely to inspire a sense of urgency.
- Make it stand out: Consider highlighting your CTA in bold text, or bright colors. The last thing you want is for people to miss the chance to click.
- Place it carefully: As a general principle, it’s a good idea to add CTAs to the end of sections or the end of the post. This is when readers are considering their next move, or thinking about the topic they have just learned about.
One note of caution — don’t go overboard with your CTAs. It might be tempting to nag your readers throughout the post, but this is likely to annoy them. It could even make them leave the page!
How to publish your blog post
Once you have written, edited, proofread, and optimized your blog post, it’s time to release it to the world.
There are many different platforms where you can share written content. However, in most cases, publishing on your own website is the best choice (more on this later).
The most popular self-hosted platform, by far, is WordPress.
Shared Hosting
Shared hosting is a web hosting plan in which multiple websites share the same server. This is typically the most affordable hosting plan, as the expense of server maintenance is distributed among multiple consumers.
Read MoreHere’s a step-by-step tutorial for sharing your work via this channel:
Step 1: Log in
Once you have set up your WordPress site, log in and visit the dashboard. You can generally find the login screen at www.yourwebsite.com/wp-admin.
Enter your username and password, and the dashboard should come up automatically.
Step 2: Open the posts screen
In the left sidebar, click on “Posts” to access the posts screen. Here, you will find a list of any posts you have published or saved as drafts.
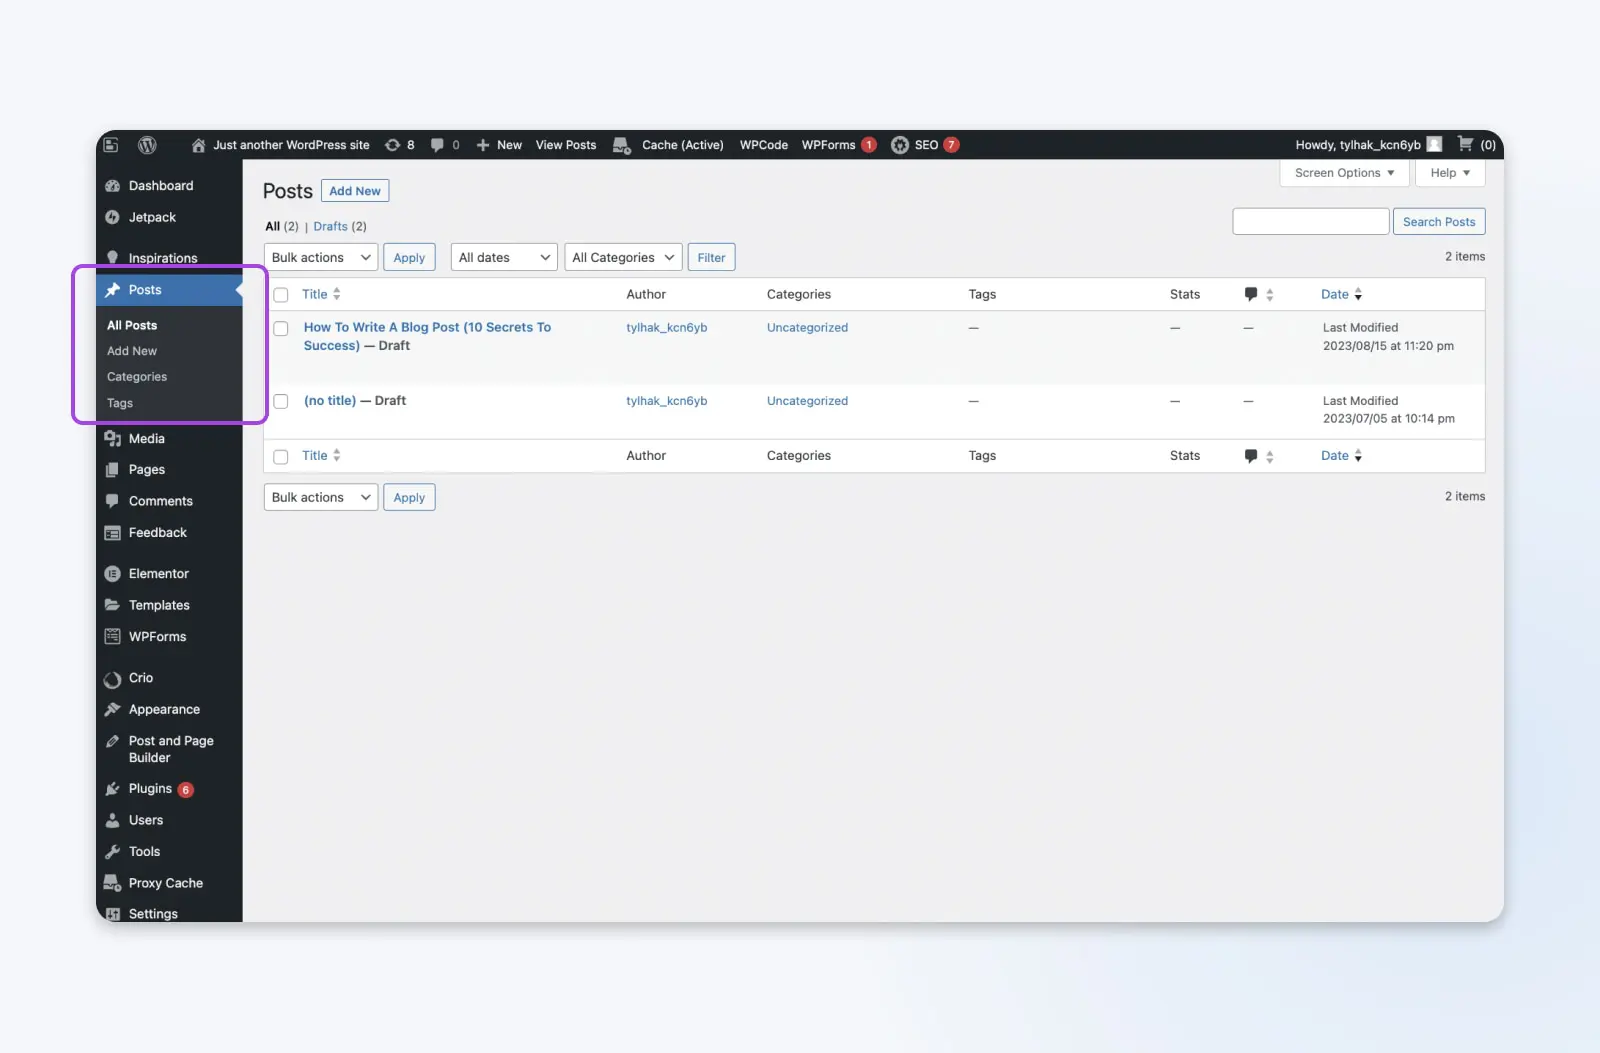
Step 3: Create a new post
At the top of the posts screen, click on the Add New button. This opens up the editor to create a new post.
At the top of the screen, enter the title of your blog post. Then, enter the main content in the editor below. You can write your post within WordPress or paste the content you saved elsewhere.
In the Gutenberg editor, you can add various types of content by clicking the blue cross at the top-left of the page and choosing what you need.
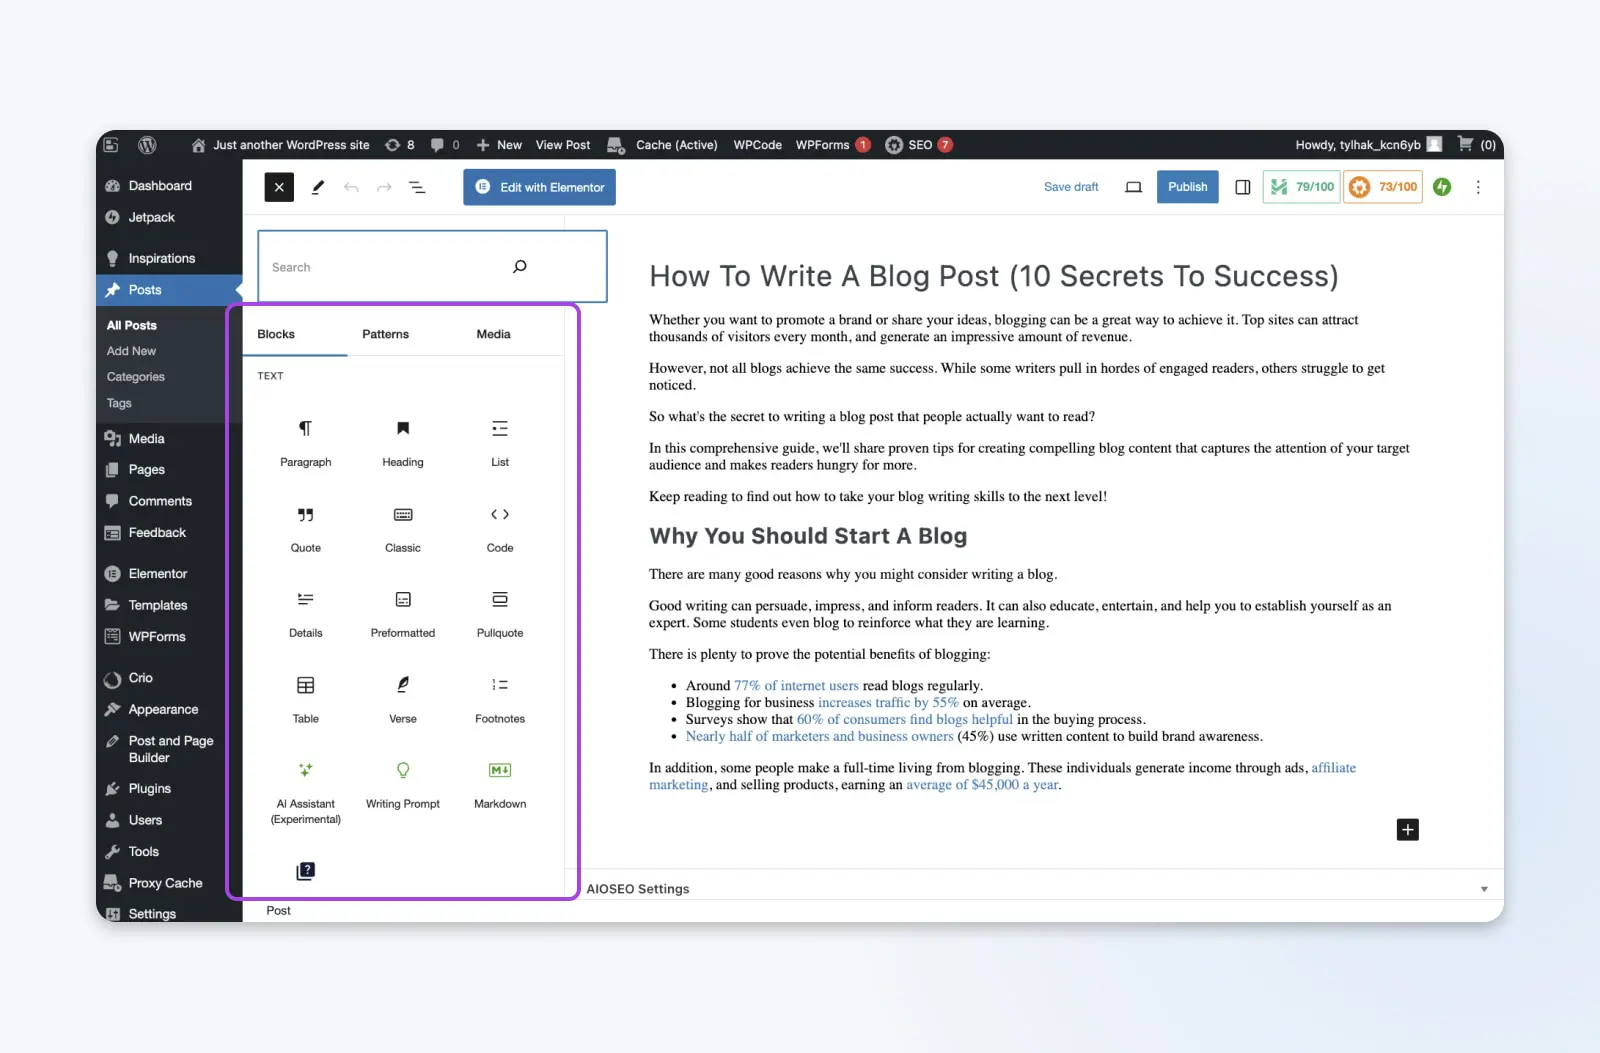
Either way, make sure to use the formatting options to style your text, add links, and insert images. The Gutenberg editor makes this easy — you simply select the type of content you want to insert, and the relevant options pop up.
Step 4: Add a category and tags
To help keep your content organized, and to help visitors to navigate, WordPress allows you to place posts in categories and add tags.
To do this with your new post, visit the Categories and Tags sections in the right-hand settings column.

If you need to create new categories or tags, consider how you plan to organize your site, and use descriptive titles.
Step 5: Set a featured image
You know how most blogs and news sites place a preview image next to each headline? That’s the featured image.
To choose a photo to go with your blog post, tap the blue cross in the top-left to open the blocks menu and select Post Featured Image. You can then click on the block and upload an image from your computer.
Featured Image
A featured image is a graphic that represents the contents of a blog post or page. It usually appears at the top of each post and in blog feeds, alongside post titles and excerpts.
Read MoreStep 6: Publish and view
Once you’re ready to share your post, you have two options: publish now or schedule it to be published later.
If you’re ready to share straight away, you can hit the blue Publish button at the top of the page.
If you want to schedule the post for the future, open the Settings pane and select the Post tab. Here, you will see a line that says Publish Immediately. You will need to tap on the Immediately part to access the options you need.
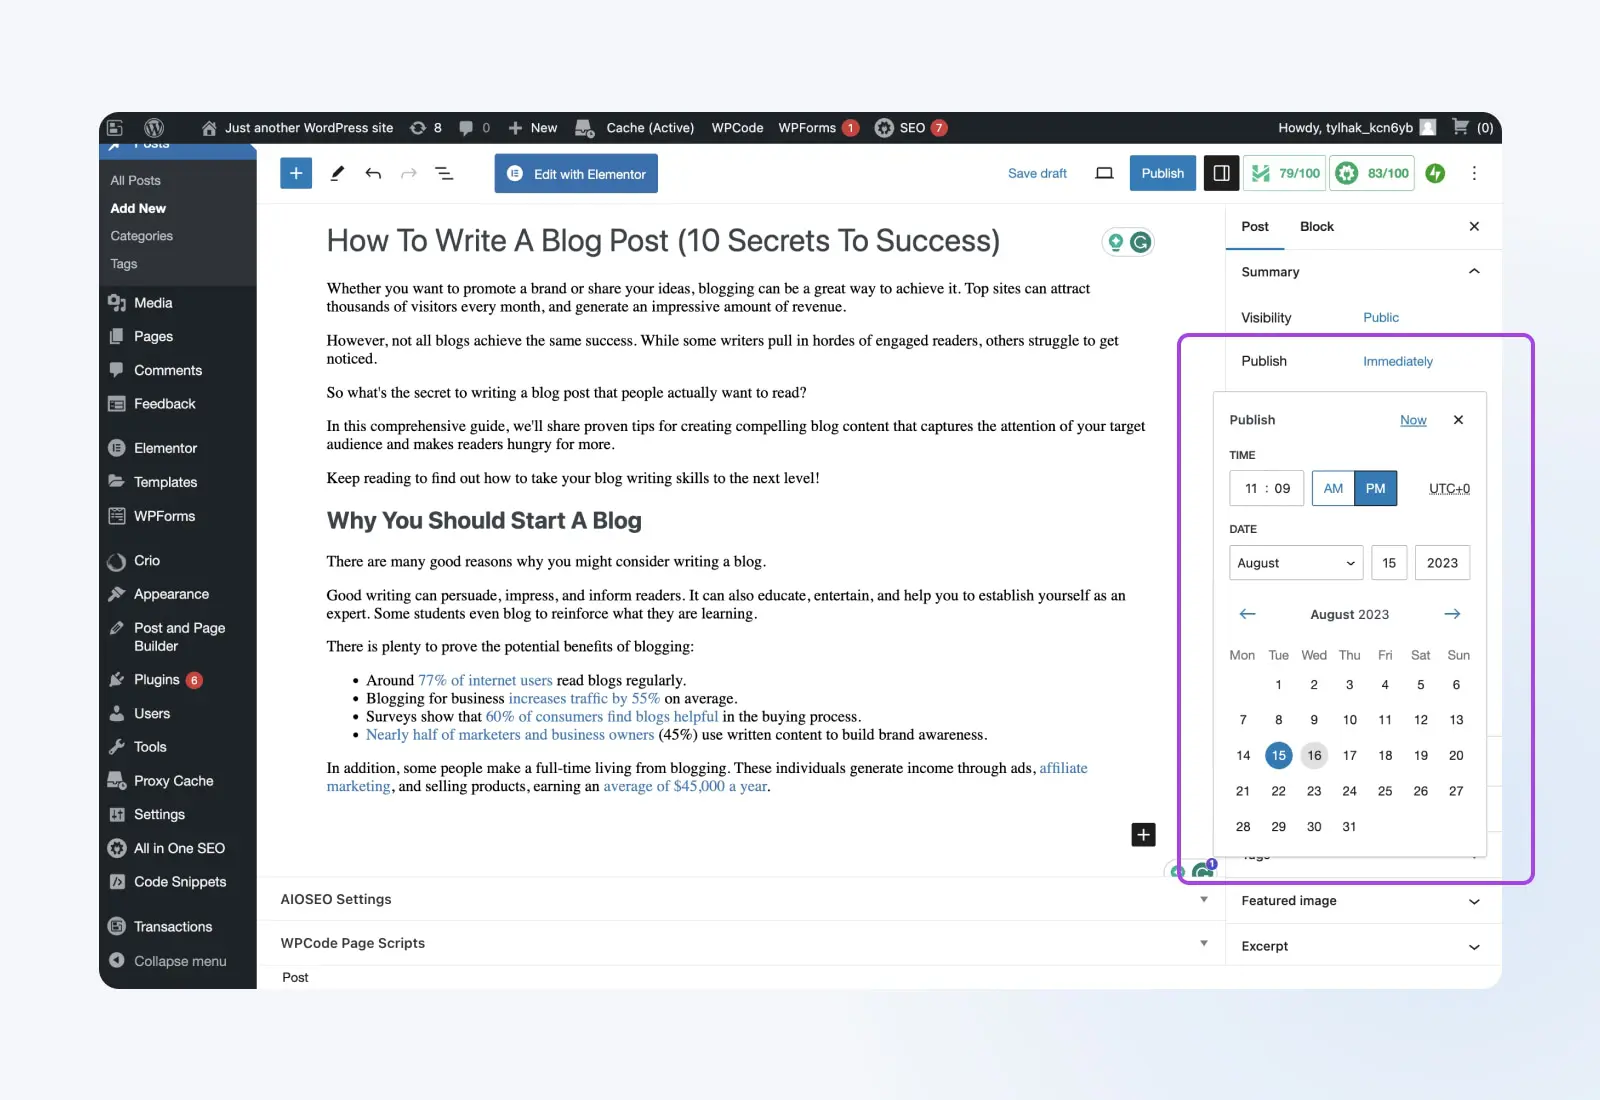
You can then set a date and time. The blue button at the top of the page will change to read Schedule. Click on this, and your post will go out at the time you want.
Once your post is published, click View Post at the top of the page to see it live on your site.
And that’s it! Your post is out in the big wide world. If you need to make any changes, you can return to the Posts page in WordPress and click on the headline to re-enter the editing screen.
Self-publishing vs. blogging platforms
As mentioned, WordPress isn’t the only system for sharing your posts.
Other options include:
- Other self-hosted CMS platforms, like Drupal and Ghost
- All-in-one website builders
- Blogging networks, like Medium
- Social media platforms that support longer posts
The real decision is hosted versus self-hosted:
- Hosted platforms (blogging networks, website builders, and WordPress.com plans): The platform handles the technical work for you, which is genuinely convenient. The trade-offs: many restrict or forbid how you can monetize, limit your design and plugin choices, and keep your content on someone else’s turf. If the platform changes its rules, you live with them.
- Self-hosted (the free WordPress.org software on hosting you choose): You take on a little more setup, but you own the site outright, with full control over monetization, design, plugins, and portability. If you outgrow your host, you can take everything with you.
(A common point of confusion: WordPress.com is a hosted service built on the WordPress software, while WordPress.org is the free software itself, which you can install with any host. When we say “self-hosted WordPress,” we mean the latter.)
Weighing it all up, we believe self-hosting with WordPress is the best option for most new bloggers. Because…
- It’s easy to set up
- WordPress is free to use
- Hosting is affordable
- You retain full control over your content
- WordPress gives you access to useful plugins
You can install WordPress using DreamHost’s 1-click installer on any of our hosting plans.
Alternatively, you can check out DreamPress, DreamHost’s managed WordPress hosting, and we can take care of the technical side for you.
Whichever option you choose, you’ll get a free domain for the first year, unmetered bandwidth, and a free SSL certificate for better security.
Not sure what to call your blog? Use the say-it-out-loud test: tell a friend the name, and if you have to spell it or explain it, pick something simpler. Short, niche-relevant, and easy to type wins; hyphens and numbers are the usual culprits behind mistyped addresses (if your dream name is strength-training-4-new-parents.com, keep brainstorming). A “.com” is still the safest choice, and you can check what’s available through DreamHost’s domain registration search.
SSL/TLS
SSL stands for Secure Sockets Layer. In short, it’s a protocol for maintaining a secure connection and protecting sensitive data. Transport Layer Security (TLS) is the successor to SSL. It is a cryptographic protocol that provides a safe connection over any given computer network.
Read MorePromoting your blog
Great content doesn’t always get the attention it deserves. The web is a noisy place, with millions of sites vying for the attention of readers. Unless you promote your work, people won’t even know it exists.
Here are some of the most effective ways to reach your target audience:
Search engine optimization
SEO marketing can be an effective strategy for bringing people to your blog. What’s more, you can do much of the work as you write your post.
However, search rankings are becoming increasingly competitive, and the big players tend to do plenty of work outside of content optimization.
As a newcomer, you will need to be smart about your approach if you want to see significant traffic in the short term. Use our SEO Toolkit and platforms like Ahrefs to optimize your site, and to look for search terms where competition is less fierce.
It’s also worth noting that the returns on SEO tend to grow over time. Publish optimized content regularly, and you are likely to see your posts start to appear on search engines.
Social media marketing
As a new blogger, you might need to reach out to your target audience to gain new readers. Sharing your content on social media is one way of achieving this.
The exact playbook here really depends on which platforms you use. On LinkedIn, Facebook, Reddit, and now X (formerly Twitter), it’s possible to share a healthy extract from your blog post. You can then add a link to the original article, and encourage people to visit if they want to read more.
Visual apps like Instagram and TikTok are a little different. Here, you could try sharing the featured image of your blog post and putting the link in your bio. Alternatively, you could record yourself talking about the post.
Email marketing
Of course, persuading people to visit your site in this way takes a lot of effort. That’s why most bloggers also have an email list.
The idea is pretty straightforward: When someone visits your site for the first time, you ask them to sign up for updates. Then, you send them an email every time you publish a new post (tools such as Mailchimp can automate this process).
This gives you a better chance of converting new visitors into repeat readers.
Sounds great, right? Well, just bear in mind that people are reluctant to share their email address nowadays. To increase your chance of earning new subscribers, use plugins to add pop-up forms to your website, and consider offering a free download in return for someone’s email.
Connect with other bloggers and influencers
Trying to build a blog on your own can feel like an uphill task. That’s why many bloggers work together for mutual benefit.
The classic type of collaboration is guest blogging. This is where you contribute content to someone else’s site. The advantage of doing so is that you get the chance to reach new readers and link back to your own site. Meanwhile, the other site gets free content for their audience to enjoy.
Guest blogging agreements are often reciprocal, where bloggers guest post on each other’s sites. However, larger sites will often welcome submissions of free content. This can be a great way to tap into a large, well-established audience.
Collaboration doesn’t only happen between bloggers. Teaming up with any type of influencer who publishes similar content can be beneficial. For instance, you could set up reciprocal promotions between your blog and a popular Instagram account.
Similarly, appearing as a guest on a podcast can really boost awareness of your site. Most podcast hosts are always on the lookout for good guests — particularly experts or people with a story to tell.
It’s also worth making connections with the wider community of blog owners. Small groups of writers will often agree to promote each other via social media channels to boost the collective reach of their blogs. Plus, groups like this often share knowledge between their members.
How bloggers make money
Blogging income is real, but it rarely shows up in month one. Per Ryan Robinson’s blogger income guide (updated June 2026), bloggers make around $45,000 a year on average, with most earning between $38,440 and $51,906. That money usually comes from four channels:
- Display ads: Ad networks pay per impression or click. They’re easy to set up, but you need substantial traffic before the payouts are meaningful.
- Affiliate marketing: You recommend products and earn a commission on sales made through your links. It works best when you genuinely use what you recommend.
- Your own products and services: Ebooks, courses, templates, or consulting. Slower to build, but you keep the whole margin and own the customer relationship.
- Sponsored content: Brands pay for posts or mentions once your audience is worth reaching.
One non-negotiable: disclose affiliate links and sponsorships clearly, near the content they apply to. In the US, the FTC requires it, and readers trust bloggers who are upfront about how they earn.
Measure your results (and update what underperforms)
Publishing isn’t the finish line. To know whether a post actually worked, watch three things:
- Impressions and clicks: Google Search Console shows which queries surface your post and how often people click through.
- Engagement: Your analytics show how long readers stay and where they go next.
- Conversions: Newsletter signups, CTA clicks, or sales — whatever the post was meant to drive.
Give a new post a few months to find its footing in search before judging it. And when a post underperforms, don’t delete it. Improve it: sharpen the headline, answer the questions Search Console shows people actually asking, refresh outdated statistics, and add depth where competitors go deeper. Few bloggers bother, which makes it an edge: only 38% of bloggers update older articles, yet 34% say updating content produces strong results, per OptinMonster (updated December 2025).
Frequently asked questions
How do beginners start writing blog content?
Pick one specific question your audience asks and answer it in a structured post: a clear headline, a direct answer up top, short paragraphs, and headings. Draft freely, edit the next day, then publish. Your first few posts will teach you more than any guide.
How long should a blog post be?
Long enough to answer the question fully, and no longer. Readers skim (the average visit lasts under a minute), so structure beats sheer length. On competitive topics, go deeper than the current top results: only 14% of bloggers regularly write 2,000+ words, per OptinMonster (December 2025).
How do I add a blog to my existing website?
If your site runs WordPress, blogging is built in: create posts under Posts and add your blog page to the site navigation. On other platforms, use the built-in blog feature or install WordPress on a subdomain, like blog.yoursite.com.
How often should I publish blog posts?
Pick a schedule you can sustain. One post a week is plenty for most beginners, and 44% of bloggers publish three to six times a month, per OptinMonster (December 2025). Consistency beats bursts of output every time.
Can I use AI to write blog posts?
Yes, as a drafting aid rather than a ghostwriter. Use AI for topic angles, outlines, and rough drafts, then rewrite in your own voice, fact-check every claim, and add first-hand detail. Unedited AI content reads generic and can include invented facts.
Bringing it all together: Your guide to blogging success
From audience research to social media promotion, we’ve covered a lot of ground in this guide, so let’s do a quick recap of the key points:
- Know your audience and spend time generating compelling ideas to meet their needs.
- Titles and headlines are crucial, so explore different options to find something irresistible.
- Structure your content carefully with headings, images, and paragraph breaks to improve readability.
- Bring your writing to life using storytelling techniques and descriptive language.
- Optimize for search engines by going in-depth on topics and using relevant keywords.
- Always cite sources, proofread thoroughly, and consider adding a call-to-action.
- Self-publish using WordPress for maximum control.
- Promote your content through SEO, social media, email marketing, and collaborations.
Applying these tips to your blog is almost certain to enhance your writing and improve traffic to your site. But ultimately, success comes down to writing great content and publishing it consistently. For most new bloggers, that means a schedule you can actually keep (weekly, or a few times a month), planned on a simple editorial calendar with ideas and drafts batched ahead of time.
If you need an easy way to start your blog or improve an existing site, DreamHost offers hosting that is truly affordable and easy to configure. We can also help you grab a great domain, upgrade the design of your blog, and optimize your entire site for search.
So, what are you waiting for? It’s time to start sharing your ideas with the world. We can’t wait to read what you create.

Launch Your Website with DreamPress
Our automatic updates and strong security defenses take server management off your hands so you can focus on creating a great website.
Check Out PlansDid you enjoy this article?